History: MultiLangVsNetQuickTourWindowsStore
Preview of version: 23
- «
- »
Multi-Language Add-In for Visual Studio
Quick Tour (Windows Store Apps)
Activating the Multi-Language Add-In
After you have installed the Add-In, there will be a new menu item in the Tools menu in Visual Studio.
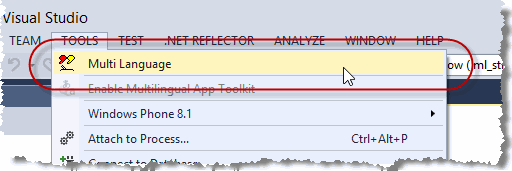
This menu item activates the Add-In and shows it in a tool-window. You can dock this window at the side of the main Visual Studio window, or drag it into a tab group, like other tool windows in Visual Studio. It's probably best to place it at the bottom, in a wide format.

Selecting a project
A Visual Studio solution may contain multiple projects. The Multi-Language Add-In usually works with a single project. To get started, you must first select the project. There are two ways to do this.
| from a dialog | When you select the Add-In from the tools menu, it will probably show a list of the projects in a dialog. Simply select the project and click on OK. 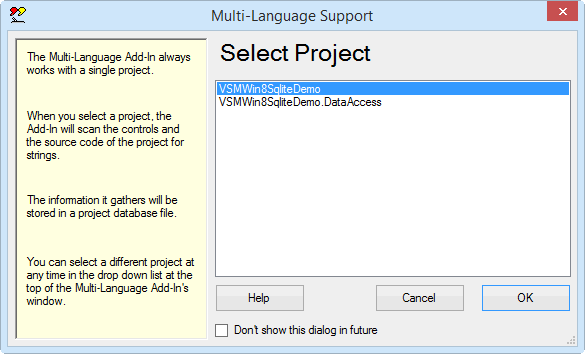
This dialog can be disabled, so if somebody else has already worked with the Add-In, it might not appear. |
| from a drop down list | At the top of the Add-In's main window, just below the toolbar, there is a drop down project list 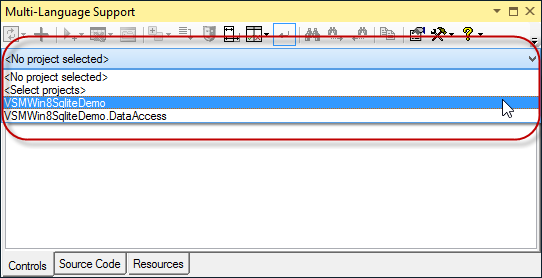
You can select a different project at any time from this list. |
Initialising the project for localization
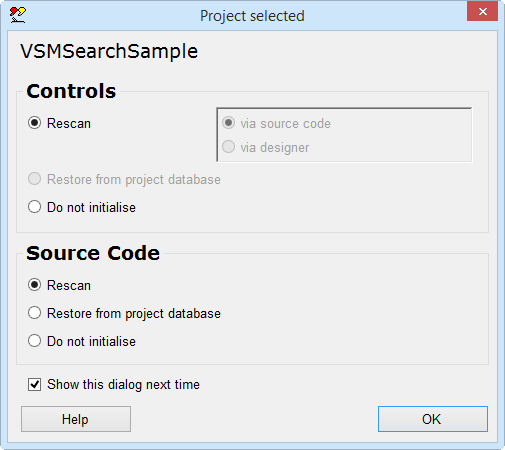
When you select a Windows Store project, the Add-In will automatically detect:
|

|
|

|
|
This dialog will probably be followed by second dialog, with options for scanning the project. Just click on OK to accept the default options. |
| <project name>_ml.xml | This is the project database used by the Add-In. It is added to the project with BuildAction=None. |
| mlstring.vb or mlstring.cs | This module contains support functions, in particular the function ml.GetString(), which is used to load localized strings. |
Scanning the project
The Add-In will now scan the project. This is performed in three phases:
| Resource files | String resources defined for the default language in a resource file with the .resw extension are read and displayed in the Resources tab. |
| Controls | The user interface definition in the XAML files is read. Texts which can be translated are displayed in the Controls tab. |
| Source code | The project source code is scanned for texts which may require translation. The texts are displayed ih the Source code tab. |
|
The results of the scan are displayed in three separate grids in the Add-In's window. You can switch between these grids using the tabs at the bottom of the window. |
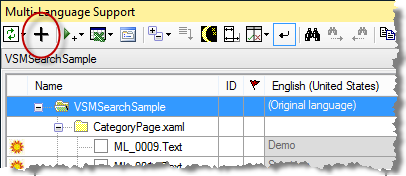
Adding a second language
To add a new language to the project, click on the  symbol on the Add-In's toolbar.
 |
|

|
Select a new language from the list. The buttons below the list change the way the list is displayed. In particular, the button English simply shows the language names in English. It does not select English in the list. If the Microsoft Translator supports both the default language and the selected language then the option Get translations from Microsoft Translator is enabled. Similarly for the Google Translator. Select one of these options if you want the texts to be translated automatically using an online service. Click on OK to add this language to the project. |
Some languages, such as German or French, are considered to be neutral languages. The regional variations, such as German(Germany), German(Austria), French(France) or French(Canada) are referred to as specific languages. You should usually start with the neutral language.
After adding the second language, the Add-In will
- add a new column to the grids for the new language
- search for translations of common texts such as OK and Cancel in the Global Translations Database
- if you selected the Microsoft or Google Translator option, then it will translate all other texts using the online service
Now we will take a closer look at the three grids.
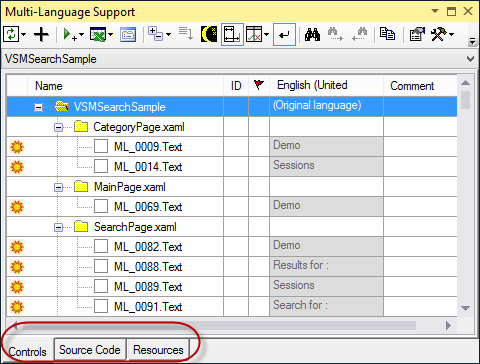
The controls grid
To see the controls grid, make sure that the controls tab at the bottom of the window is selected. The grid should look something like the following screenshot.

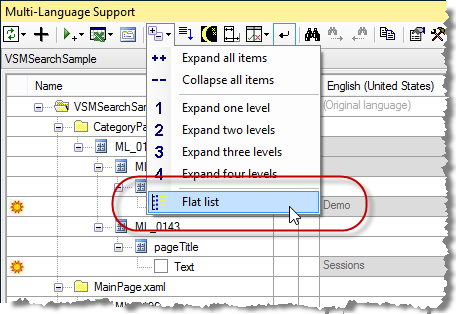
By default, the text attributes are shown in a hierarchical manner, showing the structure of the XAML file. As an alternative, you can view the text attributes for each XAML file in a flat list. To select this mode, click on the  button on the toolbar and then select Flat list from the menu, as shown below:
The controls grid will then look something like the following screenshot.

If an element in the XAML structure does not have a name, then it is assigned one by the Add-In. As you can see, these names have the form ML_0000 with 0000 is a numeric value.
To the left of each name of each text attribute there is a check box which indicates whether the attribute has been selected for translation. Initially, none of the attributes are selected. To select an attribute, simply click on the check box. Alternatively, you can select the line and hit the space bar.
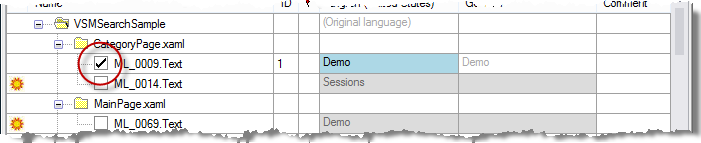
As you can see, the grid has a column for each language in the project. Once a property has been selected, you can enter a translation simply by clicking on the cell in the appropriate column and entering the translation. If you are able to translate the text yourself, this is the easiest way enter translations.
If a text is shown in light grey, then it is the text which would be retrieved at runtime via the resource fallback mechanism. In general, if a text is not defined for a specific language (e.g. Spanish(Mexico)) then the text for the neutral language (e.g. Spanish) would be used. If this has not been defined, then the text for the default language would be used.
When you select a text attribute, the XAML code may be modified, so that the attribute is initialised from a resource file. The exact modification depends on several factors, as described below:
|
Text attribute of a XAML control |
The attribute x:Uid is added. The Uid is always generated in the form ML_0000, because it must be unique in the complete project. A resource string is defined with the name <Uid>.<Attribute name> Before <Button Content="OK" x:Name="OKButton" Click="OKButton_Click" /> After <Button Content="OK" x:Name="OKButton" Click="OKButton_Click" x:Uid="ML_0009" /> A resource string with the name ML_0009.Content is defined with the text "OK". |
|
A simple text in a TextBlock control |
Before <TextBlock>One</TextBlock> After <TextBlock x:Uid="ML_0011">One</TextBlock>> |
|
One of multiple texts in a TextBlock control |
Before <TextBlock>One<LineBreak/>Two</TextBlock> After <TextBlock><Run x:Uid="ML_0014">One</Run><LineBreak />Two</TextBlock> |
The check boxes to the left of the property name indicates that the text has been selected for translation. By default, all properties which contain a non empty string are selected. In the screenshot above, you can see two menu separators with the text "-". It makes no sense to translate these, so we can deselect them by clicking on the check boxes.
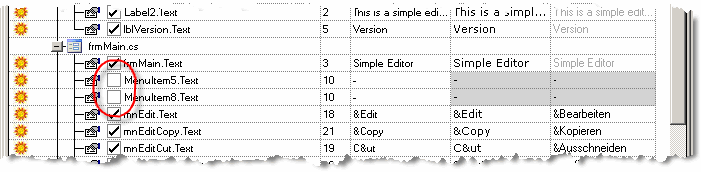
In fact, we never really want to see these properties again, so we can go one step further and hide them completely. To do this, we first click on the sun symbol  at the left hand margin. The sun symbol is replaced by a moon symbol
  .
.
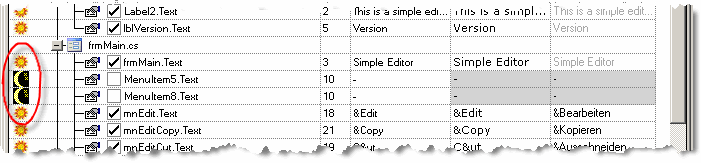
To actually hide the lines, click on the mask symbol on the toolbar  . If you want the hidden properties to be shown again, click on the
button on the toolbar and select ''Show hidden properties" from the menu.
. If you want the hidden properties to be shown again, click on the
button on the toolbar and select ''Show hidden properties" from the menu.
By default, properties containing empty strings are not shown in the grid. It very rarely makes sense to translate empty strings, so this if sensible setting. If you do want to see localizable properties containing empty strings, then you can modify this option in the settings dialog. To show this dialog click on the settings button  on the toolbar. Details of this and other options are described in the online help file.