History: MultilangVB6QuickTour
Preview of version: 12
Multi-Language Add-In for Visual Basic 6
Plugin execution pending approval
This plugin was recently added or modified. Until an editor of the site validates the parameters, execution will not be possible.
Plugin execution pending approval
This plugin was recently added or modified. Until an editor of the site validates the parameters, execution will not be possible.
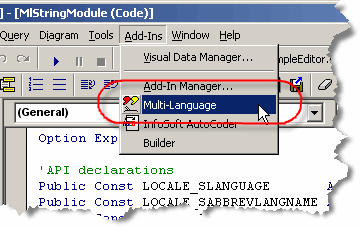
This menu item activates the Add-In and shows it in a tool-window. Like other tool windows in Visual Basic, you can dock this window at any side of the main Visual Basic window. It's probably best to place it at the bottom, in a wide format.
You may close the window at any time and reopen it using the Add-Ins menu.
Selecting a project
In Visual Basic, you may work with a project group containing multiple projects. However, the Multi-Language Add-In always works with a single project. To get started, you must first select a project. There are two ways to do this.
| from a dialog | When you select the Add-In from the Add-Ins menu, it will probably show a list of the projects in a dialog. Simply select the project and click on OK. 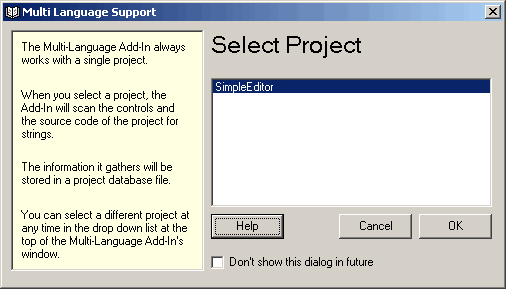
This dialog can be disabled, so if somebody else has already worked with the Add-In, it might not appear. |
| from a drop down list | At the top of the Add-In's main window, just below the toolbar, there is a drop down project list 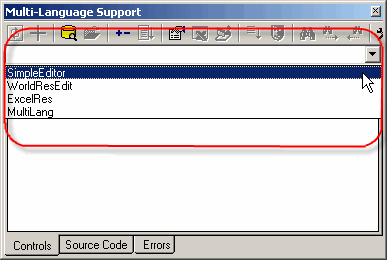
You can select a different project at any time from this list. |
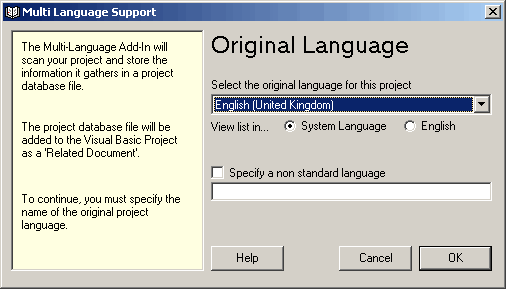
Initialising the project for localization
|
When you select a project for the first time, you must specify what the original language of the project is. You can select the language from a drop down list containing all of the languages supported by Windows. It is also possible to specify a non standard language, but this is not recommended. |
|
| <project name>_ml.mdb | This is the project database used by the Add-In. It is added to the project as a related document. |
| mlstring.vb | This module contains support functions, in particular the function ml_string(), which is used to load localized strings. |
Scanning the project
The Add-In will now scan the project. This is performed in two phases:
- scanning source code
- scanning controls
In the first phase, the source code of the project is scanned for texts which may require translation. In the second phase, the controls in each Form, UserControl and UserDocument are scanned for properties containing strings.
The results of the scan are displayed in two separate grids in the Add-In's window. You can switch between these grids using the tabs at the bottom of the window.

The controls database
At this point, you may see one or more error messages in the Errors tab.

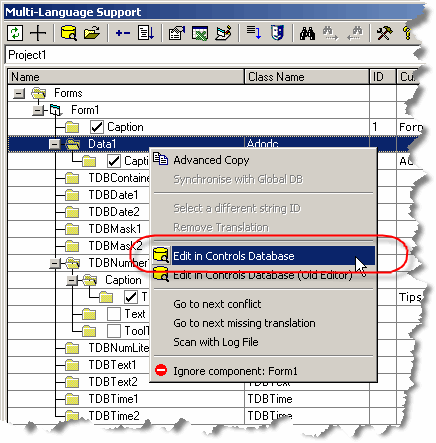
For example, the screenshot shows the error message TDBDate6Ctl.TDBDate not found in the Controls-Database. This error is easy to fix, but first we must take a look at the Controls Database.
You may already have wondered, how the Multi-Language Add-In knows which properties require translation and whether it is restricted to a small number of common controls. The Add-In uses a database to store details of which properties may require translation. The initial version of this database contains the standard VB controls and some of the most commonly used controls. It is easy to add additional controls to the database yourself.
The error message shown above contains a shortcut to add the control to the database. Simply click on the yellow database symbol  to open the database editor. The first time you click on this symbol, a form will appear while the Add-In build a list of available controls. After this, the controls database editor will be opened for the control indicated in the error message.
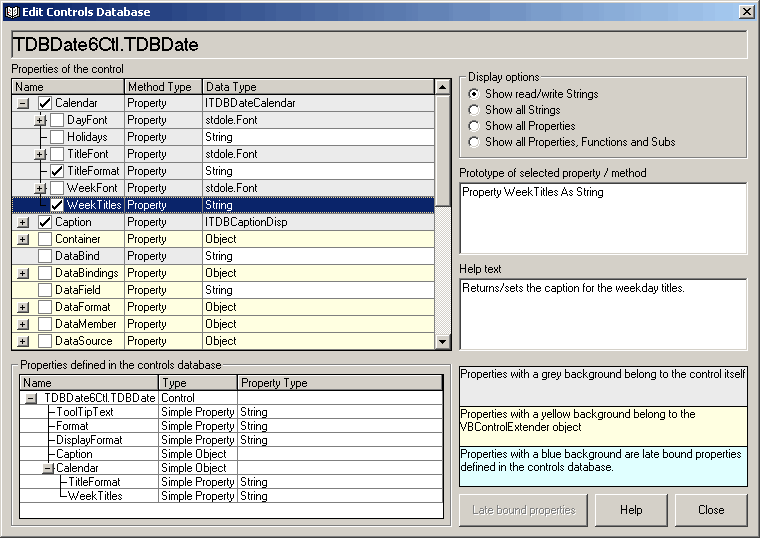
The list at the top left hand side shows the string properties of the control, plus additional objects which may be expanded to show additional properties. In most cases, you simply have to select the properties which require translation and close the dialog with the close button.
The list at the bottom left hand side shows the properties which have been selected. You will usually need some knowledge of the control to determine which properties require translation. (In the specific case shown TDBDate6Ctl.TDBDate, I have no idea which properties really require translation.)
After updating the controls database, you must rescan your project, before the changes take effect.
The database format is very flexible and can handle all of the following cases:
| Controls with no localizable properties | The Add-In will show an error message for each unknown control. It therefore makes sense to add controls to the database, even if they do not have any properties which require translation. |
| Simple text properties | The most basic type of property. Text properties may be selected at the top level, or an child properties of objects and collections. |
| String arrays | In some cases, strings are stored in an array property. In this case, you must specify

|
| Simple objects | In some cases, a property may returns an object, which in turn has text properties. In order to select the text property, you must first select the object property. The controls database then defines a hierarchical structure of properties. 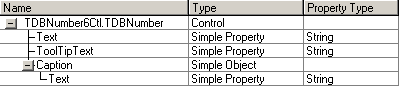
|
| Collections | Many controls, such as a toolbar, status bar or tab strip, contain object collections. For example, the ToolBar control contains a collection of buttons, each of which has a Caption and a ToolTip property which would require translation. In fact, a each toolbar button may have a collection of button menu items, each of which has a text property. 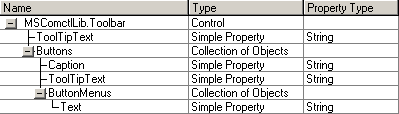
Collections in VB usually start with the index 1, but there are some exceptions, for example the Columns collection in the DataGrid control. 
This is important for the Add-In, because it the items using the Item property (rather than the for each mechanism). |
| Object arrays | Sometimes a property may be an array of objects, but not actually a collection. As with an array of strings, you must specify a property specifying the array size and define the index of the first item. For example, the Sheet property of the GridWiz control is a zero-based array of objects. The size of the array is defined by the NumSheets property. 
Here you can see additional trick, to access the Cell property of the Sheet object using the fixed value of 0 for the first parameter. In this case, it refers to the column headers in a grid. |
You can view the complete contents of the controls database, by clicking on the yellow database symbol
on the toolbar. From this view you can add new controls to the database and edit existing items. In addition, you can open the controls database editor for a specific control via the context menu in the controls grid.
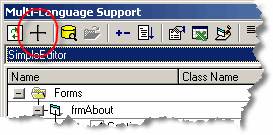
Adding a second language
To add a new language to the project, click on the  symbol on the Add-In's toolbar
 |
|
|
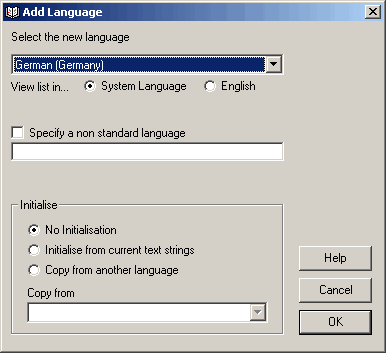
This brings up a dialog with which you can add a new language to the project. You can select a language from a drop down list showing all of the languages supported by Windows. Then simply click on OK to add the language to your project. If you wish, you can initialise the texts in the new language based on the texts for another language, but this is not recommended. |
- add a new column to the grids for the new language
- search for translations of common texts such as OK and Cancel in the Global Translations Database
Now we will take a closer look at the two grids.
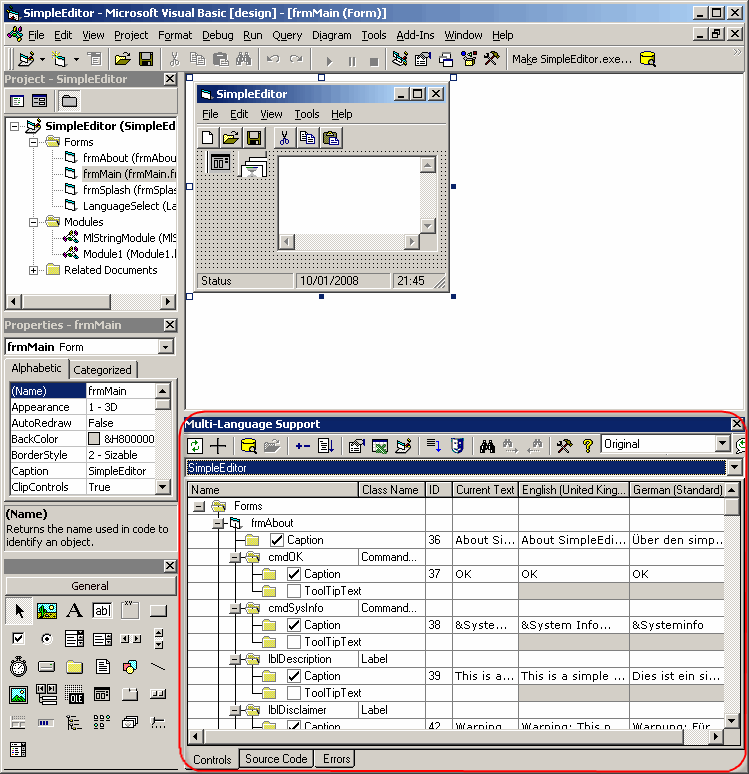
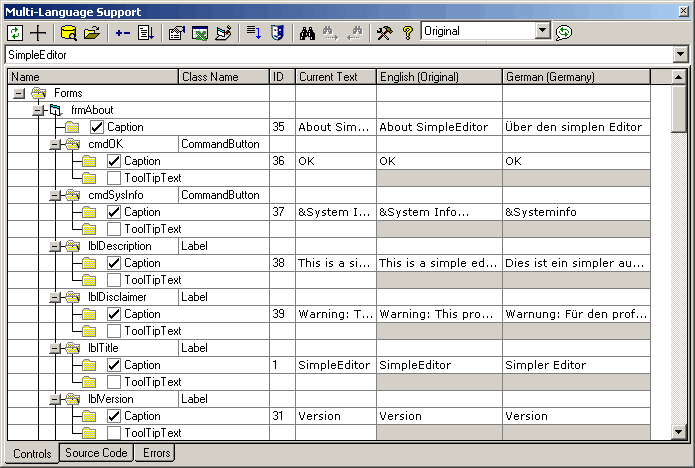
The controls grid
To see the controls grid, make sure that the controls tab at the bottom of the window is selected. The grid should look something like the following screenshot.
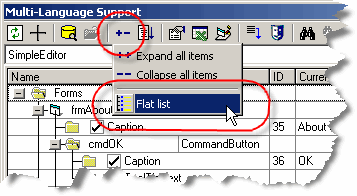
By default, the properties are shown in a hierarchical manner, showing the association of properties to controls. As an alternative, you can view the properties on each Form, UserControl or UserDocument in a flat list. To select this mode, click on the  button on the toolbar and then select Flat list from the menu.
 |
|

To enter a translation, simply click in cell and type in the new text. If you are able to translate the text yourself, this is the easiest way enter translations.
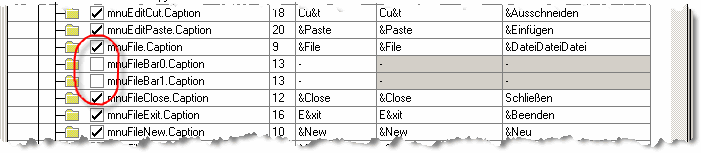
The check boxes to the left of the property name indicates that the text has been selected for translation. By default, all properties which contain a non empty string are selected. In the screenshot above, you can see two menu separators with the text "-". It makes no sense to translate these, so we can remove deselect them by clicking on the check boxes.
By default, properties containing empty strings are not shown in the grid. It very rarely makes sense to translate empty strings, so this if sensible setting. If you do want to see properties containing empty strings, then you can modify this option in the settings dialog. To show this dialog click on the settings button  on the toolbar. Details of this and other options are described in the online help file.
The source code grid
To see the source code grid, make sure that the source code tab at the bottom of the window is selected. The grid should look something like the following screenshot.
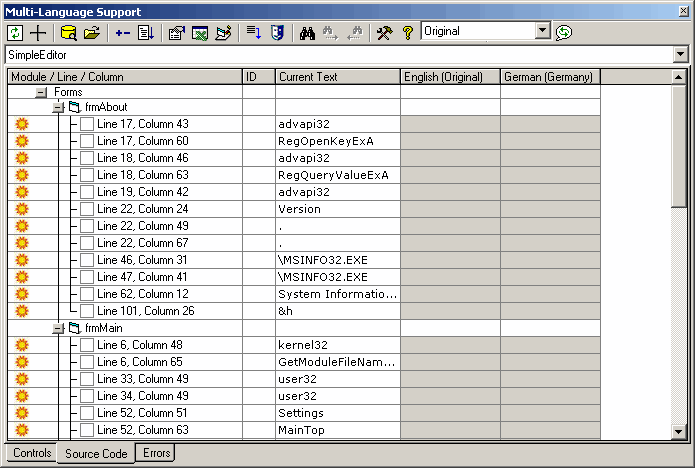
As in the controls grid, you can select a string for translation by clicking in the checkbox to the left of the line number. In contrast to the controls grid however, none of the texts are selected automatically.
|
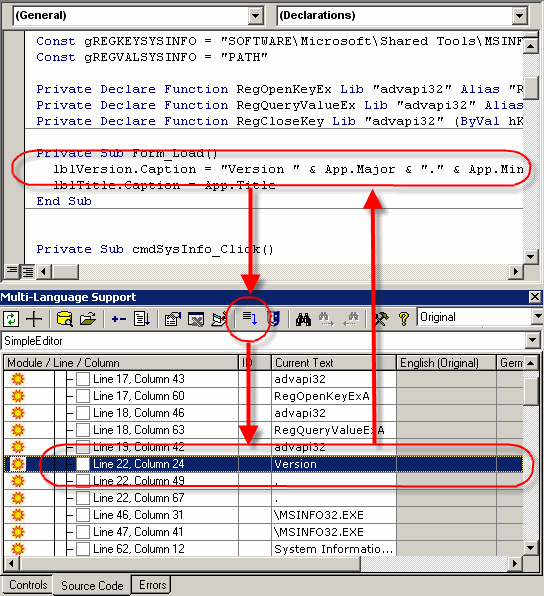
When you click on a line in the source code grid, the corresponding line in the source code will be shown in the source editor. Alternativly, if you select a line in the source editor, which contains a string, you can locate this line in the source code grid by clicking on the goto line button  on the toolbar.
 |
|
|
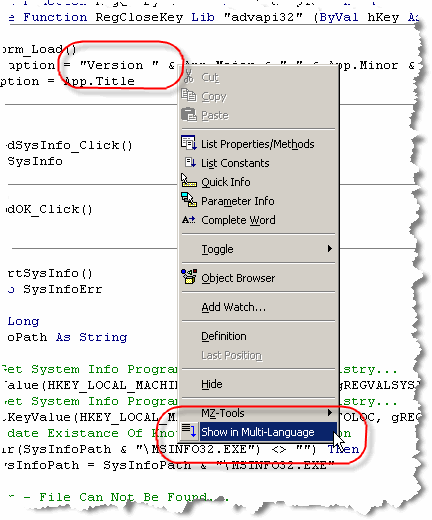
Another way to locate a line in the source code grid is to select Show in Multi-Language from the context menu in the source code editor. |
When you select a string for translation by clicking on the checkbox, the Add-In will assign a string ID number to the text and insert a call to the function ml_string() into the source code.
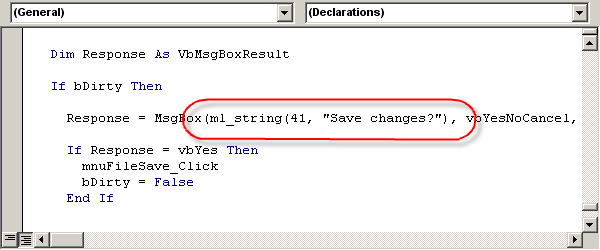
As you can see, this function has two parameters:
- the String ID number and
- the original text
In fact only the string ID will actually be used, so you could consider the original text as a comment. Leaving the original text in the source code serves to make the code more readable. Once a string has been selected for translation, you can enter a translation simply by typing a new text into the grid.
The function ml_string is implemented in the module MlStringModule.bas which was added to the project from a template file (usually in the directory C:\Program Files\MultiLang\Templates).
If you do not select a string for translation, you have the option of hiding the string instead. To hide a strign, we first click on the sun symbol  at the left hand margin. The sun symbol is replaced by a moon symbol
  . At the same time, the comment 'MLHIDE is added to the end of the source code line, to mark it as hidden.
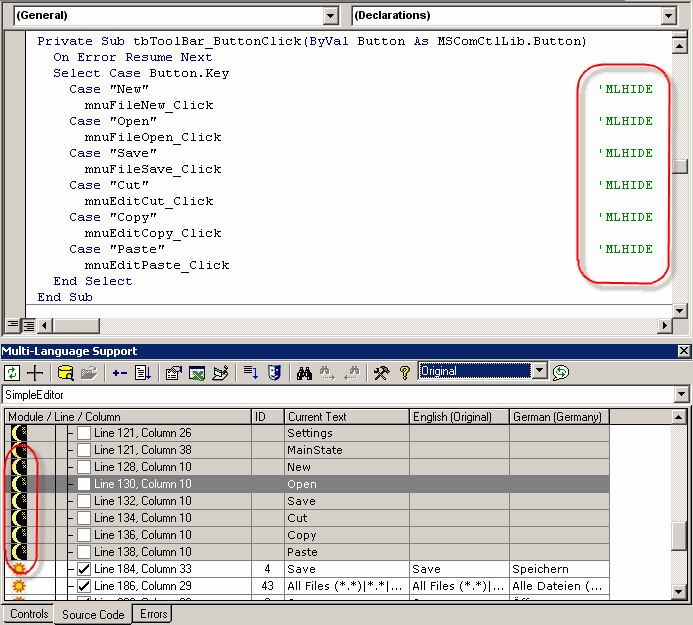
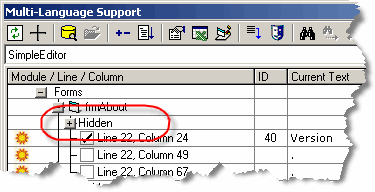
To actually hide the lines, click on the mask symbol on the toolbar  . The hidden items are collapsed behind a new node hidden and you can view them at any time simply be expanding this node.
It is good practice to either select or hide every string in the project. If new strings are added to the source code at a later stage, it is then much easier to find the new strings in the grid. Of course, you can also add the MLHIDE comment to lines in the source code editor. When the Add-In scans the project, it will automatically hide these strings.